

- Introduction
- Major Changes in Release 6.9a
- Operations Overview
- Operating Requirements
- Windows PC Installation Instructions
- Mac Installation Instructions
- Release History
- User's Guide
- Further Reading
- Acknowledgements
- Contact Information
Introduction
TG was developed to make the calculation of transform coefficients easier – avoiding the need for large Excel spreadsheets. When used in conjunction with VPHOT to identify standard stars it reduces the time to generate transforms to less than half an hour.
TG V6.9a supports the following standard fields:
- M67
- NGC 7790
- NGC 1252
- NGC 3532
- M11
- Melotte 111
- Landolt Fields
A table containing links to the chart and photometry table for each of these fields can be found here: https://www.aavso.org/apps/vsd/stdfields
It is assumed users are familiar with transformation concepts as explained in Chapter Six of the CCD Photometry Guide - https://www.aavso.org/ccd-camera-photometry-guide
TG runs on both Windows and Mac computers. There has been some use under Ubuntu and Linux but no recent testing.
While the program is written in Python, no knowledge of Python is required. Specific installation instructions are provided below.
Major Changes in Release 6.9a
- TG was modified to be compatible for the new VSP release. This prevents the problem where users were receiving a "Could Not Access the AAVSO Website" error message
- Enable single-filter Transform Coefficient Generation
- Adds capability to load a single file from VPhot containing all instrument file magnitudes from all filters - see the User's Guide, section 3.4.3
- With this release, we are also announcing a new installation process for TG running on Windows computers. Users may download a single file to install TG as an alternative to downloading the Python Anaconda library. See the installation instructions below. The Mac version still requires installation of the Python Anaconda library.
Operations Overview
Users first obtain images of a standard starfield using different filters and software packages such as VPHOT, AIP4WIN, or MaxIm to process the images and create instrument magnitude output files of the standard stars within the field. VPhot is recommended as the easiest way to create the instrument magnitude files.
After starting TG, users enter the name of their telescope, select the standard star field used and load their instrument magnitude file(s). TG calculates all transform values. Users analyze each transform by viewing plots showing the raw data with the linear fit which defines the transform value. Outlier data points can be deactivated by users interacting with the plot. After reviewing each transform, users save the entire transform set.
Subsequently, users can examine and compare saved transform sets. They can select the best sets and average them, producing a master set of transforms. This master set is saved to a file that can be printed or loaded directly into AAVSO’s Transform Applier (TA) tool.
A detailed users guide is available TransformGeneratorUsersGuide.
Operating Requirements
TG requires the use of Python along with several additional libraries. Installation options are described below
Execution of TG requires an active Internet connection.
Windows PC Installation Instructions
There are two different ways to install TG. Users may download a single file (the new process announced April 2023), or download and install the Anaconda library as done previously. Once installed, the only operational difference is the single file download installation requires up to 30 seconds to start each time you run the program as the system initializes the environment. The Anaconda library installation version starts promptly. The program runs identically either way.
Single File Installation Process
Set up a folder on your computer. Location is not important. Most users create a file named “TG Programs” in their Documents folder. Download the installation file - TG_V6.9a_single_file_install.zip - into this folder and un-zip the file. (It’s a large 300 megabyte file. If Windows automatically downloads the file to your ‘Downloads’ folder, move it to the folder you created.) Windows may say the file is infected. It’s been checked by Microsoft, and found to be safe. So, when Windows gives you the option to run, you can safely select “Run Anyway”. Or, if it automatically removes the file, use these instructions Microsoft provided to clear the erroneous detection:
1. Open command prompt as administrator and change directory to c:\Program Files\Windows Defender
2. Run "MpCmdRun.exe -removedefinitions -dynamicsignatures"
3. Run "MpCmdRun.exe -SignatureUpdate"
Alternatively, the latest definition is available for download here: https://docs.microsoft.com/microsoft-365/security/defender-endpoint/manage-updates-baselines-microsoft-defender-antivirus
Once the file is in the folder, use File Explorer to locate the file, right click, select the “Send To” option, then “Desktop (create shortcut)”. (On some windows versions, this option is on a second window you open by clicking “Show More Options” at the bottom of the first menu that appears.)
To start the program, select the new icon on your home screen. It will take up to 30 seconds to start. The first time the program executes, Windows may say there’s a virus. You can safely check the Run Anyway option.
The program is now successfully installed. The User’s Guide contains detailed operating instructions.
Anaconda Library Installation Process
This is the original method of installing and running TG. It takes more time to set up but provides faster start-up of the program.
Download Required Files
Download this zip file (TG_V6.9a_InstallationFiles.zip) containing two files:
- TG_V6.9a.pyw – the program file
- M67_T17_20140330_Photometry_Demo_instrument_mags.txt - a demonstration instrument magnitude measurement file
Updating an existing TG installation: If you previously installed TG, installation only requires you copy the TG_V6.9a.pyw file downloaded above into the Photometry directory. To create a new desktop icon to start the program, navigate to the TG_V6.9a.pyw file using Windows Explorer. Right click on the file name, and select “Send to” > "Desktop (create shortcut)".
Installing into Existing Python Installations: There are many different Python installation alternatives – not fully compatible with each other. If you have one installed, try to run TG in that environment. If it does not run successfully, the best approach is probably to do a clean installation using the Anaconda environment below.
New Installations Requiring Anaconda Suite Download: TG runs with the standard Python suite known as Anaconda. Download the current Anaconda version from https://www.anaconda.com/products/distribution. (The current tested version as of this posting is Anaconda3-2023.03-Windows-x86_64.) Then run the install program, accepting defaults (including installing for “Just Me (recommended)”, EXCEPT for one item. On the Advanced options menu, select the three options shown below unless you are an experienced Python user who runs multiple versions of Python on your computer. This will install Anaconda into a new Anaconda3 folder c:/Users/(your user name)/Anaconda3
The window you modify during installation is shown below:

After successfully installing Anaconda –
- Navigate to your Anaconda3 folder using Windows Explorer and create a new subfolder “Photometry” – e.g. /Anaconda3/Photometry
- Copy the two files downloaded earlier - TG_V6.9a.pyw and M67_T17_20140330_Photometry_Demo_instrument_mags.txt - into the Photometry folder.
- Create a desktop icon to start the program by navigating to the TG_V6.9a.pyw file in /Anaconda3/Photometry; right-click on the file name, and select “Send to” > "Desktop (create shortcut)".
- Double click the icon to start the program.
If Windows requests you identify what program to use to execute TG_V6.9a.pyw, navigate and select /Anaconda3/pythonw.exe. You will need to skip over all the installed apps and at the bottom, select the option to navigate to your /Anaconda3 folder and select pythonw.exe. The program you select is automatically used in the future. FYI, when you start the program with the icon the first time, it may take 15-30 seconds to start – be patient.
You should now be up and running. But, if TG has not started, use this approach:
- Open Anaconda Navigator
- Launch Spyder
- Navigate to TG_V6.9a.pyw in the photometry folder and open it
- “Run” the program
For operational details see the TransformGeneratorUsersGuide.
Mac Installation Instructions
Download Required Files
Download this zip file (TG_V6.9a_InstallationFiles.zip) containing two files:
- TG_V6.9a.pyw – the program file
- M67_T17_20140330_Photometry_Demo_instrument_mags.txt - a demonstration instrument magnitude measurement file
Updating an existing TG installation: If you previously installed TG, updating to V6.9a only requires you copy the TG_V6.9a.pyw file into the Photometry folder. Then create a new desktop icon for the Mac. Refer to the paper Create Mac Icon to Start TransformGenerator.pdf. Also, note it can take over 15 seconds to launch the program. Please be patient.
Installing into Existing Python Installations: There are many different Python installation alternatives – not fully compatible with each other. If you have one installed, try to run TG in that environment. If it does not run successfully, the best approach is probably to do a clean installation using the Anaconda environment below.
New Installations: TG runs with the standard Python suite known as Anaconda. Download this version of the Anaconda installer - https://www.anaconda.com/products/distribution. (Note: The most recent Anaconda version that has been successfully tested is Anaconds3-2023.03-MacOSX-x86_64.pkg.) Run the install program by double clicking the downloaded .pkg file.
The Anaconda3 folder will be placed on the Macintosh HD in your user folder.
After successful installation of Anaconda, navigate to /Anaconda3 using Finder and create a new folder “Photometry” – e.g. /Anaconda3/Photometry. Copy the program TG_V6.9a.pyw and the demonstration file M67_T17_20140330_Photometry_Demo_instrument_mags.txt into the Photometry folder.
This is what it looks like in Finder:
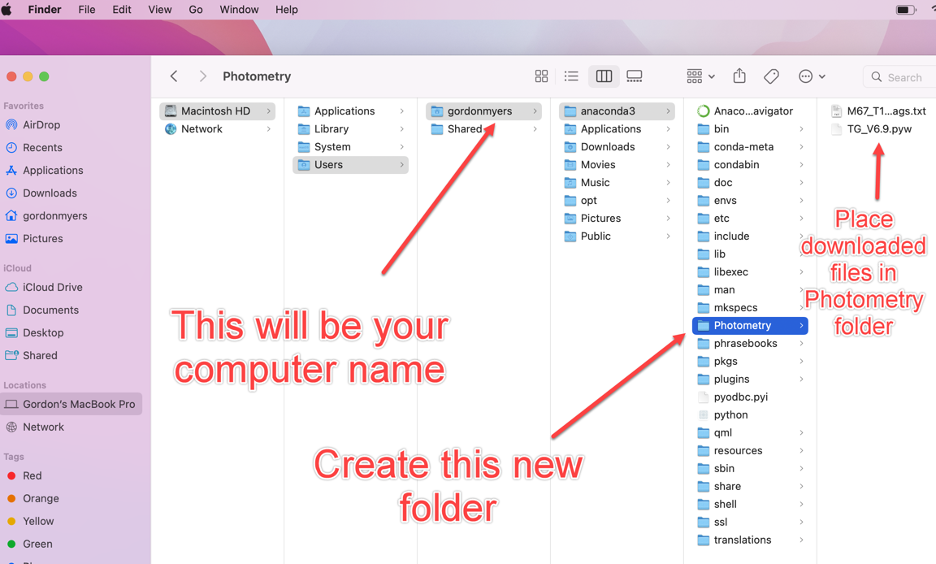
Creating a new desktop icon for the Mac takes a little extra work. Refer to the paper Create Mac Icon to Start TransformGenerator.pdf. The icon to start the program will be shown in the LaunchPad. Note it can take over 15 seconds to launch the program.
For operational details see the TransformGeneratorUsersGuide.
Release History
Version 6.9a – Maintenance and New Capability
- Fixed incompatability with updated VSP causing “Could Not Access the AAVSO Website” error message
- Added capability to create single magnitude transform coefficient for single filter transformation
Version 6.8 – Maintenance and New Capabilities
- Eliminated software security check causing a "Could not access the AAVSO website" error message
- Increased default size of plots
Version 6.6 – New Capabilities
- Created additional transform coefficient Tbr, Tbi, Tb_br, Tb_bi
- Supported the changes coming in VPhot photometry reports, the additional Max column
Version 6.4 – New Capabilities
- Added support for Landolt Fields
Version 6.3 – Maintenance and New Capabilities
- Added support for Melotte 111
- Enabled both Python 2.7 and Python 3.x
- Tested with most recent versions of Anaconda (v. 5.0.1) using both Python 2.7 and 3.6 on both Windows and Mac
- Tested with latest Mac OSX release - High Sierra
Version 6.0 – Maintenance and New Capabilities
- Added support for NGC 1252 and NGC 3532
- Error fixes
- Correction to properly handle multiple VPHOT files containing both “True” and “False” measurements of the same star (usually caused when stars are saturated in some images and not others).
- Correction causing some bright standard stars (brighter than 10th magnitude) to be excluded from calculations
Version 5.10 – Maintenance and New Capabilities
- Added Support for M11 standards field
- Changed 3 sigma error lines on plots (which had been based on the Transform slope error) to 2 sigma error lines (based on the “y axis” variance between measurements and the linear transform fit.) This gives the lines more physical meaning – in theory 95% of all measurements will be within this 2 sigma error band.
- Error fixes
- corrected calculation of the error associated with color transforms
- “Original Fit 3 sigma” line on plots changed to “All Measurements 2 sigma” line. Users see the 2 sigma error line calculated using all measurements (e.g. both active and inactive). (In addition the error lines calculated using only the currently active measurements are displayed).
Version 5.8 – Maintenance Release (Required Update)
- TG internal software changed to support new VSP API. This is a mandatory update. Previous TG versions will not run when the new VSP is released (within a few weeks of mid-August, 2015).
Version 5.7 – Maintenance Release and Mac OS X (v.10.10) Yosemite Support
- Fixed problem with deletion of saved transform
- Supported Mac OS X (v.10.10) Yosemite release
Version 5.6 – Maintenance Release
- Star add/delete label on plots corrected
- Error randomly causing one observation not to be included in transform corrected
- Description in header of .ini export file enhanced
Version 5.5 – New Capabilities Release
- Addition of 3 sigma error lines on transform plot
- Addition of scrollbars to main menus
User's Guide
The User's Guide is available here: TransformGeneratorUsersGuide
Further Reading
- Applying Transformation & Extinction to Magnitude Estimates - How Much Does it Improve Results (pptx 1.1MB)
- AAVSO CCD Photometry Guide
- AAVSO DSLR Observing Manual
Acknowledgements
Transform Generator (TG) was conceived and written by AAVSO member/observer Gordon Myers in response to a need for an easy-to-use program which aids observers computing their transformation coefficients. Ken Menzies, George Silvis, Richard Sabo and Matt Craig provided valuable advice and testing of the program.
Contact Information
Send questions and comments to Gordon Myers - gordonmyers @ hotmail.com
Copyright © 2014.